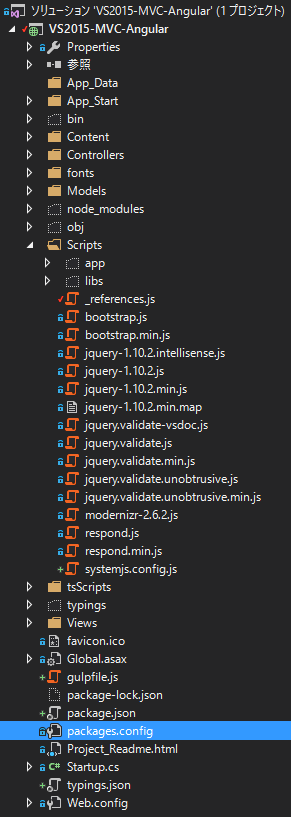
Visual Studio 2015 & MVC 4 or 5 と Angualr 2 の Projectレシピ
はじめに
(半年前に下書きにした記事なんですけど。掘り起こしてきました。)
ほんっとこの連携方法がわからなくて正直困ってたんですが、やっと頭の理解が追いついたので整理がてら記事にします。
この記事を参考にいつも作ってたんですが、この記事よりもわかりやすく日本語頑張ります。 www.mithunvp.com
背景
目的 : Visual Studio 2015でMVC Projectに Angular2 をぶち込むための方法。
(巷ではAngular5がでてきたが、まだまだAngular4.Xを使おうの企画)
対象
Angular2のプロジェクトをVisual Studio 2015 使って新規で作りたいよって人。
個人的背景
( ;´Д`) 「んー Angular-CLIで作ったプロジェクトをMVCにぶち込みたいなぁ。。。」
↓
(´゚д゚`) 「記事通り書いたつもりでも英語読み間違えてて作れないときあるなぁ。。。」
↓ (1日後)
(''ω'')ノ 「理解追いついた、、、まじ、モウ無理まとめよ。。。」(今ここ)
用意するもの
- Visual Studio 2015 or 2017 (.NET Core以外)
- Angular-CLI (https://cli.angular.io/)
ざっくり手順
手順は上記の英語記事にのっとった感じにします。
(前準備1) Visual Studioで MVC Project を作る。
npm installするためのpackage.jsonを作成する。- Angularの型定義
typings.jsonを用意 - .ts を .js に変換するときに必要な
tsconfig.jsonを作成。 gulpfile.js作ってコピーとか変換とかのタスクを纏める。main.tsを作成systemjs.config.jsをつくって依存性の管理- Angular2 を MVC で読み込む
Layout.cshtml glupfile.jsの設定
準備
(前準備1) Visual Studioで MVC Project を作る。
これはいつもの手順です。
「新規プロジェクト」⇒「ASP.NET Web アプリケーション (Visual C# .NET Framework 4.5)」⇒ 「MVC」
さ、本題です。頑張りましょう。
手順
1. npm install するための package.json typings.json を作成する。
/root に package.jsonを作成する。
サンプル json
{
  "name": "template",
  "version": "0.0.0",
  "license": "MIT",
  "scripts": {
    "ng": "ng",
    "start": "ng serve",
    "build": "ng build",
    "test": "ng test",
    "lint": "ng lint",
    "e2e": "ng e2e"
  },
  "private": true,
  "dependencies": {
    "@angular/animations": "^4.2.4",
    "@angular/common": "^4.2.4",
    "@angular/compiler": "^4.2.4",
    "@angular/core": "^4.2.4",
    "@angular/forms": "^4.2.4",
    "@angular/http": "^4.2.4",
    "@angular/platform-browser": "^4.2.4",
    "@angular/platform-browser-dynamic": "^4.2.4",
    "@angular/router": "^4.2.4",
    "core-js": "^2.4.1",
    "rxjs": "^5.4.2",
    "zone.js": "^0.8.14"
  },
  "devDependencies": {
    "@angular/cli": "1.3.2",
    "@angular/compiler-cli": "^4.2.4",
    "@angular/language-service": "^4.2.4",
    "@types/jasmine": "~2.5.53",
    "@types/jasminewd2": "~2.0.2",
    "@types/node": "~6.0.60",
    "codelyzer": "~3.1.1",
    "jasmine-core": "~2.6.2",
    "jasmine-spec-reporter": "~4.1.0",
    "karma": "~1.7.0",
    "karma-chrome-launcher": "~2.1.1",
    "karma-cli": "~1.0.1",
    "karma-coverage-istanbul-reporter": "^1.2.1",
    "karma-jasmine": "~1.1.0",
    "karma-jasmine-html-reporter": "^0.2.2",
    "protractor": "~5.1.2",
    "ts-node": "~3.2.0",
    "tslint": "~5.3.2",
    "typescript": "~2.3.3",
    "typings": "2.1.1",
    "path": "0.12.7",
    "gulp": "3.9.1",
    "gulp-clean": "0.3.2",
    "gulp-concat": "2.6.1",
    "gulp-tsc": "1.3.2",
    "gulp-typescript": "3.2.2",
    "systemjs": "^0.19"
  }
}
npm install
を実行し、node_modulesが作成する。
2. Angularの型定義typings.jsonを用意する。
1.と同じく、/root に typings.jsonを作成する。
作成したtypings.jsonに以下をコピペします。
{
  "globalDependencies": {
    "core-js": "registry:dt/core-js#0.0.0+20160725163759",
    "jasmine": "registry:dt/jasmine#2.2.0+20160621224255",
    "node": "registry:dt/node#6.0.0+20160909174046"
  }
}
このタイミングでコマンドラインで、下記を実行。
typings install
これによってAngularでの型定義が上記のファイルで定義されました。
3. '.ts' を '.js' に変換するときに必要な tsconfig.jsonを作成する。
- .tsファイルを作成・追加するためフォルダ。 tsScriptsフォルダ を
/rootに作ります。 /tsScripts/tsconfig.jsonを作成する。
{
  "compilerOptions": {
    "emitDecoratorMetadata": true,
    "experimentalDecorators": true,
    "module": "commonjs",
    "noEmitOnError": true,
    "noImplicitAny": false,
    "outDir": "../Scripts/app/",
    "removeComments": false,
    "sourceMap": true,
    "target": "es5",
    "moduleResolution": "node",
    "typeRoots": [
      "./node_modules/@types",
      "./node_modules"
    ],
    "types": [
      "node"
    ]
  },
  "exclude": [
    "node_modules"
  ]
}
.tsを.jsにトランスパイルする際の設定です。 この辺は開発環境と本番環境で書きわける内容ですね。 (コメントの有無とかmapファイルの出力だとか、)
3. gulpfile.js 作ってコピーとか変換とかのタスクをまとめる。
gulpfile.jsを /rootに作ります。
ついでに、ここで一工夫しましょう。
.tsを変換した.jsを /Scripts/app/ に、node_modules のから使うものを抜き出したものを入れるフォルダを /Scripts/libs/ にするとしましょう。
/appと/libsを/Scriptsのフォルダに作ります。

以上の工夫をしたためにglupfile.jsを以下のように書きます。
glupfile.js
var ts = require('gulp-typescript');
var gulp = require('gulp');
var clean = require('gulp-clean');

// Delete the dist directory
gulp.task('clean', function () {
    return gulp.src(destPath)
        .pipe(clean());
});

gulp.task("scriptsNStyles", function () {
    gulp.src([
            'core-js/client/*.js',
            'systemjs/dist/*.js',
            'reflect-metadata/*.js',
            'rxjs/**',
            'zone.js/dist/*.js',
            '@angular/**/bundles/*.js',
            'bootstrap/dist/js/*.js'
    ], {
        cwd: "node_modules/**"
    })
        .pipe(gulp.dest('./Scripts/libs')); // 抜き出したものを入れるフォルダ
});

var tsProject = ts.createProject('tsScripts/tsconfig.json', {
    typescript: require('typescript')
});

gulp.task('ts', function (done) {
    //var tsResult = tsProject.src()
    var tsResult = gulp.src([
            "tsScripts/*.ts"
    ])
        .pipe(tsProject(), undefined, ts.reporter.fullReporter());
    return tsResult.js.pipe(gulp.dest('./Scripts/app')); // .tsを.jsに変換したものを入れるフォルダ
});

gulp.task('default', ['scriptsNStyles', 'ts']);
4. TypeScript のファイルを入れる際に main.ts を作ろう。
.component.ts と .module.ts を /tsScripts に入れましょう。
今回、templateUrl と templateCss の設定はちょっと複雑になるので component内にコピペしておきます。
更に、main.tsを作成します。
app.component.ts
import { Component } from '@angular/core';

@Component({
  selector: 'app-root',
  template: `
  <!--The content below is only a placeholder and can be replaced.-->
  <div style="text-align:center">
    <h1>
      Welcome to {{title}}!
    </h1>
    <img width="300" src="data:image/svg+xml;base64,PD94bWwgdmVyc2lvbj0iMS4wIiBlbmNvZGluZz0idXRmLTgiPz4NCjwhLS0gR2VuZXJhdG9yOiBBZG9iZSBJbGx1c3RyYXRvciAxOS4xLjAsIFNWRyBFeHBvcnQgUGx1Zy1JbiAuIFNWRyBWZXJzaW9uOiA2LjAwIEJ1aWxkIDApICAtLT4NCjxzdmcgdmVyc2lvbj0iMS4xIiBpZD0iTGF5ZXJfMSIgeG1sbnM9Imh0dHA6Ly93d3cudzMub3JnLzIwMDAvc3ZnIiB4bWxuczp4bGluaz0iaHR0cDovL3d3dy53My5vcmcvMTk5OS94bGluayIgeD0iMHB4IiB5PSIwcHgiDQoJIHZpZXdCb3g9IjAgMCAyNTAgMjUwIiBzdHlsZT0iZW5hYmxlLWJhY2tncm91bmQ6bmV3IDAgMCAyNTAgMjUwOyIgeG1sOnNwYWNlPSJwcmVzZXJ2ZSI+DQo8c3R5bGUgdHlwZT0idGV4dC9jc3MiPg0KCS5zdDB7ZmlsbDojREQwMDMxO30NCgkuc3Qxe2ZpbGw6I0MzMDAyRjt9DQoJLnN0MntmaWxsOiNGRkZGRkY7fQ0KPC9zdHlsZT4NCjxnPg0KCTxwb2x5Z29uIGNsYXNzPSJzdDAiIHBvaW50cz0iMTI1LDMwIDEyNSwzMCAxMjUsMzAgMzEuOSw2My4yIDQ2LjEsMTg2LjMgMTI1LDIzMCAxMjUsMjMwIDEyNSwyMzAgMjAzLjksMTg2LjMgMjE4LjEsNjMuMiAJIi8+DQoJPHBvbHlnb24gY2xhc3M9InN0MSIgcG9pbnRzPSIxMjUsMzAgMTI1LDUyLjIgMTI1LDUyLjEgMTI1LDE1My40IDEyNSwxNTMuNCAxMjUsMjMwIDEyNSwyMzAgMjAzLjksMTg2LjMgMjE4LjEsNjMuMiAxMjUsMzAgCSIvPg0KCTxwYXRoIGNsYXNzPSJzdDIiIGQ9Ik0xMjUsNTIuMUw2Ni44LDE4Mi42aDBoMjEuN2gwbDExLjctMjkuMmg0OS40bDExLjcsMjkuMmgwaDIxLjdoMEwxMjUsNTIuMUwxMjUsNTIuMUwxMjUsNTIuMUwxMjUsNTIuMQ0KCQlMMTI1LDUyLjF6IE0xNDIsMTM1LjRIMTA4bDE3LTQwLjlMMTQyLDEzNS40eiIvPg0KPC9nPg0KPC9zdmc+DQo=">
  </div>
  <h2>Here are some links to help you start: </h2>
  <ul>
    <li>
      <h2><a target="_blank" href="https://angular.io/tutorial">Tour of Heroes</a></h2>
    </li>
    <li>
      <h2><a target="_blank" href="https://github.com/angular/angular-cli/wiki">CLI Documentation</a></h2>
    </li>
    <li>
      <h2><a target="_blank" href="https://blog.angular.io//">Angular blog</a></h2>
    </li>
  </ul>
  `,
  styles: [``],
})
export class AppComponent {
  title = 'app';
}
app.module.ts
///<reference path="./../typings/globals/core-js/index.d.ts"/>
import { BrowserModule } from '@angular/platform-browser';
import { NgModule } from '@angular/core';

import { AppComponent } from './app.component';

@NgModule({
  declarations: [
    AppComponent
  ],
  imports: [
    BrowserModule
  ],
  providers: [],
  bootstrap: [AppComponent]
})
export class AppModule { }
main.ts
import { platformBrowserDynamic } from '@angular/platform-browser-dynamic';
import { AppModule } from './app.module';
const platform = platformBrowserDynamic();
platform.bootstrapModule(AppModule);
この3つのfileを /tsScripts に置きます。
5. systemjs.config.js を つくって node_modules の中にある必要なファイルを取り出しやすくしよう。
次に /Scripts に systemjs.config.js を作成します。
参考
TypeScript + System.jsの構成におけるSystem.config()の基本パターン。そしてモダンWeb開発の環境をマッハで作る。 - Mainly Devel Notes
systemjs.config.js
/**
 * System configuration for Angular samples
 * Adjust as necessary for your application needs.
 */
(function (global) {
    System.config({
        paths: {
            // paths serve as alias
            'npm:': '/Scripts/libs/'
        },
        // map tells the System loader where to look for things
        map: {
            // our app is within the app folder
            app: '/Scripts',
            // angular bundles
            '@angular/core': 'npm:@angular/core/bundles/core.umd.js',
            '@angular/common': 'npm:@angular/common/bundles/common.umd.js',
            '@angular/compiler': 'npm:@angular/compiler/bundles/compiler.umd.js',
            '@angular/platform-browser': 'npm:@angular/platform-browser/bundles/platform-browser.umd.js',
            '@angular/platform-browser-dynamic': 'npm:@angular/platform-browser-dynamic/bundles/platform-browser-dynamic.umd.js',
            '@angular/http': 'npm:@angular/http/bundles/http.umd.js',
            '@angular/router': 'npm:@angular/router/bundles/router.umd.js',
            '@angular/forms': 'npm:@angular/forms/bundles/forms.umd.js',
            // other libraries
            'rxjs': 'npm:rxjs',
            'angular-in-memory-web-api': 'npm:angular-in-memory-web-api/bundles/in-memory-web-api.umd.js',
        },
        // packages tells the System loader how to load when no filename and/or no extension
        packages: {
            app: {
                main: './main.js',
                defaultExtension: 'js',
            },
            rxjs: {
                defaultExtension: 'js'
            }
        }
    });
})(this);
6. Angular2 を MVC で読み込んでもらうために Layout.cshtml に細工しよう。
/Views/Shared/_Layout.cshtmlにコピペしよう
<!DOCTYPE html> <html> <head> <meta charset="utf-8" /> <meta name="viewport" content="width=device-width, initial-scale=1.0"> <title>@ViewBag.Title - My ASP.NET Application</title> <!-- 1. Load libraries --> <!-- Polyfill(s) for older browsers --> <script src="~/Scripts/libs/core-js/client/shim.min.js"></script> <script src="~/Scripts/libs/zone.js/dist/zone.js"></script> <script src="~/Scripts/libs/systemjs/dist/system.src.js"></script> <!-- 2. Configure SystemJS --> <script src="~/Scripts/systemjs.config.js"></script> <script> System.import('../Scripts/app/main').catch(function (err) { console.error(err); }); </script> @Styles.Render("~/Content/css") @Scripts.Render("~/bundles/modernizr") </head> <body> <div class="navbar navbar-inverse navbar-fixed-top"> <div class="container"> <div class="navbar-header"> <button type="button" class="navbar-toggle" data-toggle="collapse" data-target=".navbar-collapse"> <span class="icon-bar"></span> <span class="icon-bar"></span> <span class="icon-bar"></span> </button> @Html.ActionLink("Application name", "Index", "Home", new { area = "" }, new { @class = "navbar-brand" }) </div> <div class="navbar-collapse collapse"> <ul class="nav navbar-nav"> <li>@Html.ActionLink("Home", "Index", "Home")</li> <li>@Html.ActionLink("About", "About", "Home")</li> <li>@Html.ActionLink("Contact", "Contact", "Home")</li> </ul> </div> </div> </div> <div class="container body-content"> @RenderBody() <hr /> <footer> <p>© @DateTime.Now.Year - My ASP.NET Application</p> </footer> </div> @Scripts.Render("~/bundles/jquery") @Scripts.Render("~/bundles/bootstrap") @RenderSection("scripts", required: false) </body> </html>
/Views/Home/Index.cshtmlにAngular2のタグを埋め込もう。
@{
    ViewBag.Title = "Home Page";
}

<app-root>Loading...</app-root>
7. glupfile.jsを動かす。
ここまでしたら一度Visual Studioを再起動させましょう。
その後、「表示」⇒「その他のウィンドウ」⇒「タスクランナーエクスプローラー」を選択します。
default タスクを実行。
完成
お疲れ様でした。

なんとなく仕組み分かると簡単だったゼ(汗
ばいん。